
I recently received this machine with a view to learning CNC machining.
I will be describing the assembly, software installation and use of the machine on these pages.
The machine is extremely well designed and can produce some stunning work.
My machine also has a laser cutter, it is available with or without this option.
The video on Banggood's website shows a previous model which has MDF panels in the construction. The latest version now has strong and rigid acrylic panels. When assembled with the generous section extrusions between them, the tool is very rigid. The X, Y and Z axis run smoothly on linear ball bearings and I can feel no backlash on the leadscrews. This is achieved with the use of 2 leadscrew nuts pre-loaded with adjustable springs.
The wood and plastic parts I have made can be used as patterns for casting. I will be trying this next.
Examples of my efforts so far are shown below.

Dragon engraving using a design supplied with the machine.
It is extremely detailed.

Gear cut in 4mm plywood.

Myfordboy keyfob CNC engraved in ABS.


Casting made from the engraved pattern.
My idea is to replace the spindle supplied with the tool, which is quite suitable for wood, with a much larger, more powerful one. This will involve making a new Z carriage and replacing the Y axis rods and linear bearings with some larger ones.
The construction of the machine means no existing parts will be harmed during the conversion.

The machine is supplied ready to assemble, all the parts are high quality, the fixings are
stainless steel.
stainless steel.

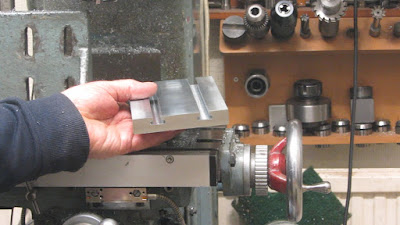
The supplied spindle (top) and the larger one I will replace it with.
The machine is supplied with 2 20° engraving cutters.
I also have a set of carbide end mills and some ball nose cutters and These engraving cutters to try.
Special offers on other CNC parts at Banggood.com click HERE
This is the link to the new spindle ,click HERE
Video
Assembly
The instructions are in the form of a series of photos which are downloaded from the link given on the Banggood sales page
They cover the build well and were easy to follow although I did make a few mistakes and had reassemble the parts.
There are some hex keys supplied with the kit that fit the stainless screws the machine is assembled with. I soon found with the large number of screws to fit it was time to get out my
set of hex bits that fit in a screwdriver type handle. Also an essential tool to have is a small spanner to fit the self locking nuts.
The first instruction Number (0) shows how two leadscrew nuts are fitted to give anti backlash to the leadscrews. I made this part first, the system works well and I could feel no backlash on the nuts.
When I assembled the other leadscrews though I followed the instructions and the backlash nut is not show so I forgot about it until I noticed there were some still in the packaging.

There are plenty of screws and fittings supplied and there were quite a few spares left at the end.
The 3 mm screws come in 2 lengths but I soon ran out of the shorter ones. Longer ones can be used for all the assembly but you need to keep back the short ones for fitting the motors as I found out later.
I also found the 5 mm ones were a little long and bottomed out when fitting the panels to the extrusions so I shortened them.There were plenty of washers left at the end, (referred to in the instructions a shims) so instead of shortening the screws the washers could be used under the screw heads.
Ball bearings are used at each end of the X axis screw and I found these were a little loose in the panels but some thin tape wrapped around made them secure. Loctite could have been used as an alternative.
Another mistake I made was to fit the Y carriage the wrong way around, easily corrected though, only 4 screws involved.
At the end of the mechanical construction I found there were 4 blue anodised cone shaped spacers left. These had not been mentioned in the instructions but referring back to the sales page I noticed they were supposed to be used under the X axis motor fixings.
The control board supplied was different to the one shown, an improved version. I was not sure of the connections but a search on the Banggood site showed the controller for sale as a separate item and connections which shown there.
On the board there is a potentiometer for each axis. Adjusting these will increase the current to the motor for more power but I have not found it necessary to alter these.

On the board there is a potentiometer for each axis. Adjusting these will increase the current to the motor for more power but I have not found it necessary to alter these.

Overall impression
The design is very well thought out. The acrylic sides and aluminium extrusions make a very rigid construction. There is no play in the leadscrews. The spindle is small and only allows small cuts.
This is my first experience with CNC and I have enjoyed learning and using the machine.
I now have the larger spindle mentioned earlier fitted and have been able to cut 1/8 brass using this. More modifications to follow.
The spindle/controller I bought can be only used in AC220V±10% 50/60Hz, so it is not suitable for 110v but read the notes on the alternative controller I am now using, later on this page.
The motor needs 100v to power it.
The motor needs 100v to power it.

Milling brass sheet.
Video
Video
I had a few problems installing the software with various error messages appearing when following the instructions but a friend and fellow modeler in Canada was able sort it out for me despite being 3800 miles away.
He has very kindly written the details below.
Banggood seem to have changed the link to the software and you are now directed to the Eleksmaker site which does not seem to very helpful to me.
Email me if you would like the old link.


UGS - new GUI
A further development of the Universal Gcode sender, this product has a new look. You can download it here along with the latest classic UGS: https://github.com/winder/Universal-G-Code-Sender
GRBL-PANEL
GRBL Panel seeks to emulate the control panels of professional CNC machines. You can download the latest release here: https://github.com/gerritv/Grbl-Panel/files/737239/GrblPanel-Release-1.0.9.13.zip


My new side panel casting shown along side the original.


Just one more mod to do. The spindle has plenty of power but screams a bit when cutting. I have dismantled it and find the bearings are mounted in rubber boots which could allow a bit of side play.
There is plenty of room behind the chuck for an additional bearing so I will be making a new front end shield that holds 2 bearings.
02/05/17
The new bearings have been added and is a big improvement. Whilst I had the spindle apart I replace the 3 bearings with quality ones.


He has very kindly written the details below.
Banggood seem to have changed the link to the software and you are now directed to the Eleksmaker site which does not seem to very helpful to me.
Email me if you would like the old link.
Friday, 24 February 2017
Installation and Configuration of Software for the Banggood CNC Engraver
Installing and Configuring Software for the Banggood CNC Engraver
Overview
The electronics supplied with the Banggood engraver consists of an Arduino Nano board which is coupled to a cnc driver board. The Arduino runs a program called GRBL which interprets a subset of standard GCODE sent to it by a gcode sender application and sets certain output pins which supply STEP and DIRECTION signals to the driver board. The stepper motors coupled to the driver board then move the machine's 3 axes.
It's important to understand that the software supplied does not provide the latest version of any of the products included, nor are these the only alternatives for developing code or running jobs on the machine. More information will be provided later.
The software Components
There are 4 things which you must address to arrive at a working system.
- Serial over USB Drivers
- Installation/Upload of the GRBL code
- Installation of JAVA (you may already have this installed)
- Installation of the Universal Gcode sender
Drivers
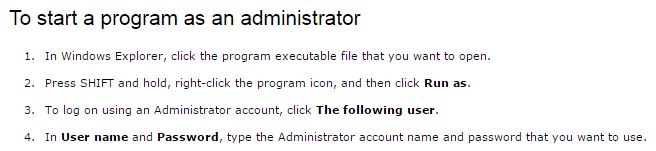
Because the machine communicates via a serial connection over a USB cable, a driver is required on the host computer. Banggood supplies a driver which will work for Windows XP, Windows 7 and Windows 10. It may work for other versions of windows, but I have not tested them. With the cnc machine disconnected from the computer, run the executable file provided.
A window will appear:
Click on the Install button and you should receive a message that the driver has been successfully pre-installed:

Now connect the cnc machine to the computer with the usb cable. At this point you should see a message indicating that the Arduino device has been detected and the driver loaded. If you wish, you can examine the system's device configuration to see what was configured. If you have multiple serial ports configured, you will want to check to see what port the Arduino is on as you will need this information for the next step. In Windows 7 as an example, click on Start, then Devices and printers. At the bottom of the page you should see something like this:
Installation of GRBL
With the driver successfully installed and the arduino detected, you can proceed to upload the GRBL code to the Auduino. Banggood has provided a version of Xloader for this purpose. At the time of writing the version of Xloader supplied was current but you can check for a newer version here: http://xloader.russemotto.com/ if you wish.
Run Xloader, setting the serial port to your arduino port and the Arduino version to the nano as shown in the program window below. The baud rate for the version of Xloader supplied when used with the nano is 57600.
The actual path to the hex file will vary from system to system. Be sure to get the Arduino type and com ports correct. Click upload. When complete Xloader will show the number of bytes uploaded. The most common problem is an incorrectly set baud rate. If you get an error “can't open port”, close the Xloader and re-run it with the correct setting. Simply changing the baud rate without closing and re-running Xloader will not work.
Note that the version of GRBL supplied is not the latest available. I suggest that you start with the Banggood supplied code. Later when you have a working system, you might want to investigate the newer code to see what new features and bug fixes it offers. You can find the latest version of GRBL here: https://github.com/gnea/grbl/releases
Note: If you are experienced with Arduino, you may wish to use the Arduino program itself to load code into your system. If so, you will have to download the source code and use the Arduino program to compile and upload it. The Arduino program cannot upload the hex file supplied.
Universal Gcode Sender
Banggood supplies a version of the Universal Gcode Sender (UGS). This is a JAVA application and if you do not already have JAVA installed, you will need to do so.
JAVA can be found here: https://java.com/en/download/
Follow the instructions found there to install the product. Once installed, the UGS can be run by simply double clicking on the supplied JAR file.
The supplied version of UGS is not the latest release. This is a product under constant development.
Note that if you have chosen to upload a different version of GRBL than the one supplied, you may have to update your GCODE sender.
UGS has recently split into 2 versions with different user interfaces.
The latest version of the UGS are here:https://github.com/winder/builds/tree/master/UniversalGCodeSender
Be sure that you have installed a compatible version of JAVA.
Run your chosen gcode sender and configure the application to communicate with your engraver. Set the serial port to your Arduino port and the baud rate to 115,200. Click OPEN and a message should appear verifying connection. Now enter the command $$ in the command line and press enter. You should get a dump of the GRBL configuration parameters.
If you don't get the indicated responses from GRBL, check the port and baud rate settings and try again.
Configuring GRBL
Now that you have a working arduino with GRBL loaded, you can configure it to suit the machine. GRBL operation is determined by a set of parameters located in the firmware.

The values in values $100 to $122 are machine dependent and must be set to the values in the table above for the Banggood engraver. For each value, enter a command: $val=number. For the X-Step value you would enter $100=400 and press enter. When done, enter the command $$ to get a dump like the one above to verify that your data entry is correct.
The values can also be changed by double clicking on the value and editing the entry.
The values can also be changed by double clicking on the value and editing the entry.
Testing
Now that you can communicate with the machine, and the configuration is correct, use the controls in the UGS to move the carriage around. The control panel in the supplied version of Universal Gcode Sender looks like the first image and the latest builds look like the following image.


Verify that the direction in which the movement occurs is correct. In some cases, stepper motor wiring or other factors may result in the directions being backward. In this case you will have to set a value in $3. This value is a bitmask. To set it, decide which axes are moving in the wrong direction and use the following table:
X is backward, Y and Z are OK: use $3=1
Y is backward, X and Z are OK: use $3=2
Z is backward, X and Y are OK: use $3=4
These values can be added to invert combinations of Axes. For example, if you want to reverse the direction of both X and Z, set $3=5. To invert all three axes, set $3=7.
For an in-depth discussion of configuring GRBL (0.9 version), you can visit https://github.com/grbl/grbl/wiki/Configuring-Grbl-v0.9
Alternatives to UGS
There are a number of alternative Gcode senders compatible with GRBL. Here are some:
A further development of the Universal Gcode sender, this product has a new look. You can download it here along with the latest classic UGS: https://github.com/winder/Universal-G-Code-Sender
bCNC
bCNC is a python application. The general steps to download and use BCNC are:
1) Download Python and install it: https://www.python.org/downloads/release/python-2710/
2) BCNC requires pyserial – Available here: https://pypi.python.org/pypi/pyserial
3) Download and Uncompress bCNChttps://github.com/vlachoudis/bCNC/archive/master.zip
4) Then just run the .bat file: "C:\bCNC\bCNC.bat"
5) Set the correct COM port and connect
Chilipeppr
Chilipeppr runs entirely in a web browser (well almost). It does require a serial port server which you can download and run inside Chilipeppr. Chilipeppr prefers the Chrome browser, but Firefox also works well.
To experience Chilipeppr, just point your browser at: http://chilipeppr.com/grbl
GRBL Panel seeks to emulate the control panels of professional CNC machines. You can download the latest release here: https://github.com/gerritv/Grbl-Panel/files/737239/GrblPanel-Release-1.0.9.13.zip
Artcam
The version of Artcam supplied with the machine is quite old, but it does have the virtue of being free. It is quite a versatile package capable of 2d and 3d projects.
The use of Artcam is very well covered by a large number of tutorials on Youtube. Be aware when consulting these videos that the version of Artcam you are using is 8 years out of date and some functions may have changed and others shown in the videos may not be available in the version you have.
Artcam Installation
First a word of warning. The artcam installation includes a file ACQ.DLL which has been known to trigger a false positive in some anti-virus programs. Observe the installation carefully. You may need to turn off your anti-virus during the install, or change your anti-virus as I chose to do (from AVG to AVAST).
Begin by double clicking the engraving software.zip file in your download folder. I use Winrar, which gives this:

Then double click the engraving folder in the winrar window which will give this:

Now right click on the ArtCAM-EN folder and select "extract to a specified folder". In the dialog which pops up, create a new folder called "engraving" in the disk of your choice, and complete the extract.
Now navigate to the folder you chose and double click it. You should see this:
 Double click the ArtCAM-EN folder and you should see this:
 Continue by double clicking the ArtCAM folder and you will get this:

Now navigate to the folder you chose and double click it. You should see this:


Now right click the Install.cmd file and select run as administrator. If you are installing on a system running Windows XP, use the following procedure:

After Install.cmd has executed successfully, you will be able to double click ArtCAM.exe to run the program. Right click and drag the ArtCAM.exe file to your desktop and select create shortcut to make running the program easier in the future.
If you receive script errors when running ArtCAM, you will need to re-run the Install.cmd script - be sure to execute it as Administrator as shown above.
Alternate CAD/CAM Programs
There are quite a number of inexpensive (or even free) CAD/CAM programs that you can download and use to create gcode for the Banggood engraver.
Some of these programs are simple and easy to learn while others are more complex and require a good deal of study before you become proficient.
Here is a small list of them with comments:
FUSION 360 is at the top of the list because it is a full featured 3D cad/cam package which large companies pay a considerable sum to use, but which is offered free to students and hobbyists. It is not a simple product but offers tremendous capabilities to those willing to invest the time. Learn more here: http://www.autodesk.com/products/fusion-360/overview
CAMBAM is a CAM software package with a limited set of CAD capabilities which is in wide use around the world. It is not free, but can be run 40 times free of charge. Learn more and download it here: http://www.cambam.info/
INKSCAPE is a professional vector graphics editor for Windows, Mac OS X and Linux. It's free and open source. Get it here: https://inkscape.org/en/
DXF2GCODE is an opensource tool for converting 2D dxf drawings to gcode. Its Sourceforge page is here: https://sourceforge.net/projects/dxf2gcode/
There are many more.
---------------------------------------------------------------------------------------------------------
13/03/17
I have now replaced the Y axis bars and bearings to stiffen up the machine. The results are good. I was able to cut out a gear wheel in 1.7mm brass using a 2mm cutter.
13/03/17
I have now replaced the Y axis bars and bearings to stiffen up the machine. The results are good. I was able to cut out a gear wheel in 1.7mm brass using a 2mm cutter.
My next plan is to cast a tee slotted table in zinc/al and replace the bars and bearings on the X axis.
18/03/17
The table has been made, new 12mm bearings have arrived and will be fitted soon.
The original plastic parts are very adequate and strong for the machine but I can't resist replacing them with some custom cast aluminium ones.
31/03/17
Y table and base completed.

09/04/17
Photo of the new Z X carriage.

My new side panel casting shown along side the original.

21/04/17
I got a bit carried away with the modifications and my machine now looks like this...............


The electronics have been fitted in a new enclosure.
There is a socket on the side for a probe which can be used to automatically set the Z height.

Just one more mod to do. The spindle has plenty of power but screams a bit when cutting. I have dismantled it and find the bearings are mounted in rubber boots which could allow a bit of side play.
There is plenty of room behind the chuck for an additional bearing so I will be making a new front end shield that holds 2 bearings.
02/05/17
The new bearings have been added and is a big improvement. Whilst I had the spindle apart I replace the 3 bearings with quality ones.
Old and new front end.

Details of the new spindle front to include 2 bearings.


Link to the engraving machine https://goo.gl/0yqwJc
500w spindle https://goo.gl/cbajr3
End Mill Cutter: https://goo.gl/tF7vr2
CNC Router Tool: https://goo.gl/12rdmQ
Linear bearing https://goo.gl/ZYujZF
12mm optical rail https://goo.gl/IFGZgw
The mulitool you see me using is the one below, cheaper than a Dremel. The flexible drive is very useful. Click on the image for more details
22/05/17
The machine is finished.
I have had a few problems with the spindle/controller causing electrical interference and
causing the programs to crash.
If you look around Youtube there are others with the same spindle having similar problems.
The suggestions include, use a short screened USB cable, fit capacitors across the motor terminals, use an optical isolator in the USB line,and fit ferrite beads to the leads.
I had tried all these and was still getting problems.
The capacitors are a no no. The power supply uses pulse wave modulation and it is not pure DC at the terminals. They get hot very quickly.
The optical isolator I tried just crashed the computer as soon as it was plugged in, maybe I had a faulty one.
I began to think the problem is the controller and not the spindle so I now have it running from a variac, bridge rectifier and smoothing capacitor circuit.
The variac enables speed control still but as I can't see the spindle being run at anything other than maximum speed this could be replaced with a basic transformer. An 80 volt transformer secondary and 2 x 4700 MFD 250v capacitors give 102 volts at the motor, same as max power with the Banggood controller.
I have 3 x 0.1 MFD ceramic capacitor on the motor terminals. One across the + and - and one from each lead to the frame of the machine which is also connected to the domestic earth supply.
The spindle draws 0.4 amps DC and the load from the mains supply is 0.75 amps. I don't know where the 500w spindle rating comes from.
So far there has been no further problems so hopefuly the problem is solved.
27/05/17
Banggood now have a new improved design of nut an as they are so cheap I have bought some to replace the original if any backlash develops..


Left, original nuts, right new ones.
The new design can been bought HERE at the time of writing there is a promotion on similar products https://goo.gl/HLK0fm
